完整系统编译
本文档主要介绍在获取完SDK后,如何进行完整的系统编译。
SDK包含了开发rk3506平台所需的各种软件组件、源代码、工具、库、文档以及示例代码等。这些资源旨在帮助开发人员基于rk3506芯片进行高效的软件开发、系统定制以及应用程序开发。
1. 依赖库安装
编译 rk3506 Linux SDK包需要一些依赖,下面将进行安装依赖操作。
安装依赖之前,最好执行以下指令更新软件包:
sudo apt update
安装依赖
#安装编译所需工具
sudo apt-get update && sudo apt-get install git ssh make gcc libssl-dev \
liblz4-tool expect expect-dev g++ patchelf chrpath gawk texinfo chrpath \
diffstat binfmt-support qemu-user-static live-build bison flex fakeroot \
cmake gcc-multilib g++-multilib unzip device-tree-compiler ncurses-dev \
libgucharmap-2-90-dev bzip2 expat gpgv2 cpp-aarch64-linux-gnu libgmp-dev \
libmpc-dev bc python-is-python3 python2 file rsync bsdmainutils mtd-utils -y
确保所有依赖安装完成。
2. 检查编译环境
- 检查和升级主机的 python 版本
$ python3 --version
Python 3.10.6
- 如果不满足python>=3.6版本的要求, 可通过如下方式升级:
⚠️注:只要python版本是3.6版本及以上均可,高版本,无需重新安装。
wget https://www.python.org/ftp/python/3.6.15/Python-3.6.15.tgz
tar xf Python-3.6.15.tgz
cd Python-3.6.15
sudo apt-get install libsqlite3-dev
./configure --enable-optimizations
sudo make install -j8
- 检查和升级主机的 make 版本(make 版本需 >= 4.2)
⚠️注:只要make版本是4.2版本及以上均可,高版本,无需重新安装。
user@ubuntu:~$ make -v
GNU Make 4.2
Built for x86_64-pc-linux-gnu
- 检查和主机的 lz4 版本
user@ubuntu:~$ lz4 -v
*** LZ4 command line interface 64-bits v1.9.3, by Yann Collet ***
3. SDK编译
3.1 选择板级配置
第一次编译时会选择板级配置,选择对应配置文件。
itrunk@itrunk:/work/rk3506_linux6.1_sdk_v1.2.0$ ./build.sh lunch

############### Rockchip Linux SDK ###############

Manifest: rk3506_linux6.1_release_v1.2.0_20250310.xml

Log colors: message notice warning error fatal

Log saved at /work/prj/rk3506/rk3506_linux6.1_sdk_v1.2.0/output/sessions/2026-04-14_10-56-40
Pick a defconfig:

1. rockchip_rk3506_b_iot_emmc_defconfig
2. rockchip_rk3506_b_iot_emmc_qt_defconfig
3. rockchip_rk3506_b_iot_nand_defconfig
4. rockchip_rk3506_g_evb_nand_defconfig
5. rockchip_rk3506_g_evb_sd_defconfig
6. rockchip_rk3506_g_iot_nand_defconfig
Which would you like? [1]:4

itrunk@itrunk:/work/rk3506_linux6.1_v1.2.0$ ./build.sh
HD-RK3506-EVB评估板,需要使用 rockchip_rk3506_g_evb_nand_defconfig 配置文件
注:选择配置文件时,以文件名为准;输入选项时,仔细核对文件名。
如果不知道选择什么配置,请根据资料下载章节,仔细阅读核心板区分部分对自己的开发板区分后再进行选择。
| 芯片 | FLASH | 底板 | 配置 |
|---|---|---|---|
| RK3506G | NAND | HD-RK3506-EVB | rockchip_rk3506_g_evb_nand_defconfig |
| RK3506G | SD卡 | HD-RK3506-EVB | rockchip_rk3506_g_evb_sd_defconfig |
3.2 完整编译
在当前目录,执行以下命令,编译所有,包括uboot、kernel、buildroot、recovery等一键编译。
./build.sh
整个过程耗时较长,根据电脑性能决定编译时间。
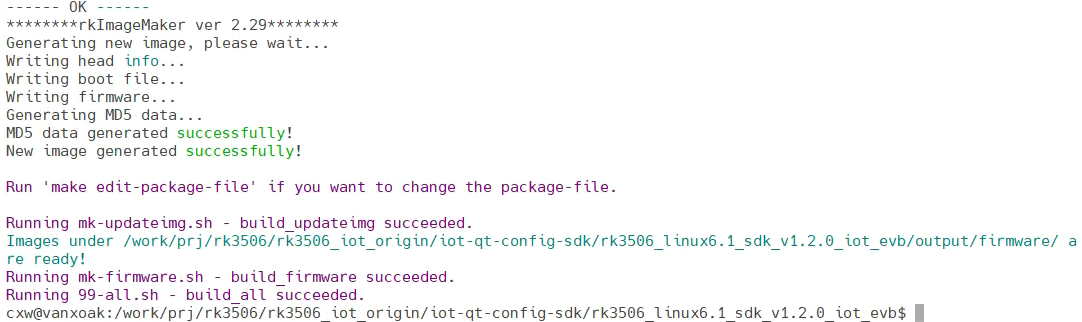
编译完成后,固件将会存放在 rockdev目录。
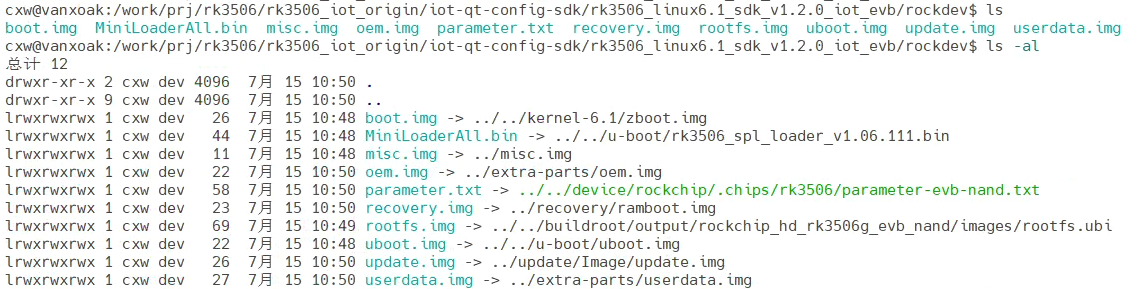
3.3 单独编译
当需要单独更新内核或uboot时,可使用以下命令单独编译。
./build.sh u-boot						# 单独编译u-boot

./build.sh kernel						# 单独编译 kernel

./build.sh buildroot				# 单独编译buildroot
3.4 打包固件
执行以下命令,将会重新打包所有固件。
适合单独编译后,需要把修改的u-boot或内核,合并成整包固件,即rockdev/update.img。用户可以直接烧录该固件。
./build.sh updateimg
3.5 固件组成
系统固件各个组成部分的来源如下表所示。
| 来源 | 文件 | 描述 |
|---|---|---|
| uboot | MiniLoaderAll.bin | 引导文件 |
| uboot.img | uboot镜像 | |
| kernel | boot.img | 内核镜像 |
| buildroot | recovery.img | recovery镜像 |
| rootfs.img | 文件系统镜像 | |
| 杂项 | misc.img | 来自rockchip的自定义文件 |
| oem.img | oem分区的固件镜像 | |
| parameter.txt | 分区表 | |
| userdata.img | 用户空间的固件镜像 | |
| update.img | 上述文件打包而成,完整的系统镜像 |
4. update.img打包制作
进入SDK目录查看 tools/linux/Linux_Pack_Firmware/rockdev/rk3506-package-file文件,其中未被#注释的固件都会在打包过程中被打包进update.img。
# NAME		Relative path
#
#HWDEF		HWDEF
package-file	package-file
bootloader	Image/MiniLoaderAll.bin
parameter	Image/parameter.txt
uboot       Image/uboot.img
boot        Image/boot.img
rootfs      Image/rootfs.img
recovery	Image/recovery.img
oem			Image/oem.img
userdata    Image/userdata.img
misc		Image/misc.img
# 要写入backup分区的文件就是自身(update.img)
# SELF 是关键字,表示升级文件(update.img)自身
# 在生成升级文件时,不加入SELF文件的内容,但在头部信息中有记录
# 在解包升级文件时,不解包SELF文件的内容。
  backup		RESERVED
#update-script	update-script
#recover-script	recover-script
一般此文件无须修改,将我们自己的制作的固件放入rockdev,固件名与package-file文件一样:
vanxoak@bab121111f64:/work/bsp/rk3506/rk3506-linux6.1-sdk_release$  ls rockdev/
boot.img           misc.img  parameter.txt  uboot.img
MiniLoaderAll.bin  oem.img   recovery.img   rootfs.img   userdata.img
执行命令打包整包 ./build.sh updateimg,最后会在rockdev目录下生成新的update.img。
vanxoak@bab121111f64:/work/bsp/rk3506/rk3506-linux6.1-sdk_release$ ./build.sh updateimg

Making update image...
==========================================
Start packing update image
==========================================
Generating package-file for update:
# NAME  PATH
  package-file    package-file
parameter       parameter.txt
bootloader      MiniLoaderAll.bin
uboot   uboot.img
misc    misc.img
recovery        recovery.img
boot    boot.img
rootfs  rootfs.img
oem     oem.img
userdata        userdata.img
Packing /work/itrunk/rk3506/rk3506_linux6.1_sdk_release/output/firmware/update.img for update...
Android Firmware Package Tool v2.27
------ PACKAGE ------
Add file: ./package-file
package-file,Add file: ./package-file done,offset=0x800,size=0xd1,userspace=0x1
Add file: ./parameter.txt
parameter,Add file: ./parameter.txt done,offset=0x1000,size=0x1ec,userspace=0x1,flash_address=0x00000000
Add file: ./MiniLoaderAll.bin
bootloader,Add file: ./MiniLoaderAll.bin done,offset=0x1800,size=0x411c0,userspace=0x83
Add file: ./uboot.img
uboot,Add file: ./uboot.img done,offset=0x43000,size=0x400000,userspace=0x800,flash_address=0x00002000
Add file: ./misc.img
misc,Add file: ./misc.img done,offset=0x443000,size=0xc000,userspace=0x18,flash_address=0x00004000
Add file: ./recovery.img
recovery,Add file: ./recovery.img done,offset=0x44f000,size=0xde1600,userspace=0x1bc3,flash_address=0x00004a00
Add file: ./boot.img
boot,Add file: ./boot.img done,offset=0x1230800,size=0x3d2e00,userspace=0x7a6,flash_address=0x0000ba00
Add file: ./rootfs.img
rootfs,Add file: ./rootfs.img done,offset=0x1603800,size=0x2780000,userspace=0x4f00,flash_address=0x00010a00
Add file: ./oem.img
oem,Add file: ./oem.img done,offset=0x3d83800,size=0x660000,userspace=0xcc0,flash_address=0x00030a00
Add file: ./userdata.img
userdata,Add file: ./userdata.img done,offset=0x43e3800,size=0x260000,userspace=0x4c0,flash_address=0x00038a00
Add CRC...
Make firmware OK!
------ OK ------
********rkImageMaker ver 2.23********
Generating new image, please wait...
Writing head info...
Writing boot file...
Writing firmware...
Generating MD5 data...
MD5 data generated successfully!
New image generated successfully!

Run 'make edit-package-file' if you want to change the package-file.

Running 90-updateimg.sh - build_updateimg succeeded.